How to Create a Swept Path Diagram Without CAD: Click by Click, With Two Australian Examples

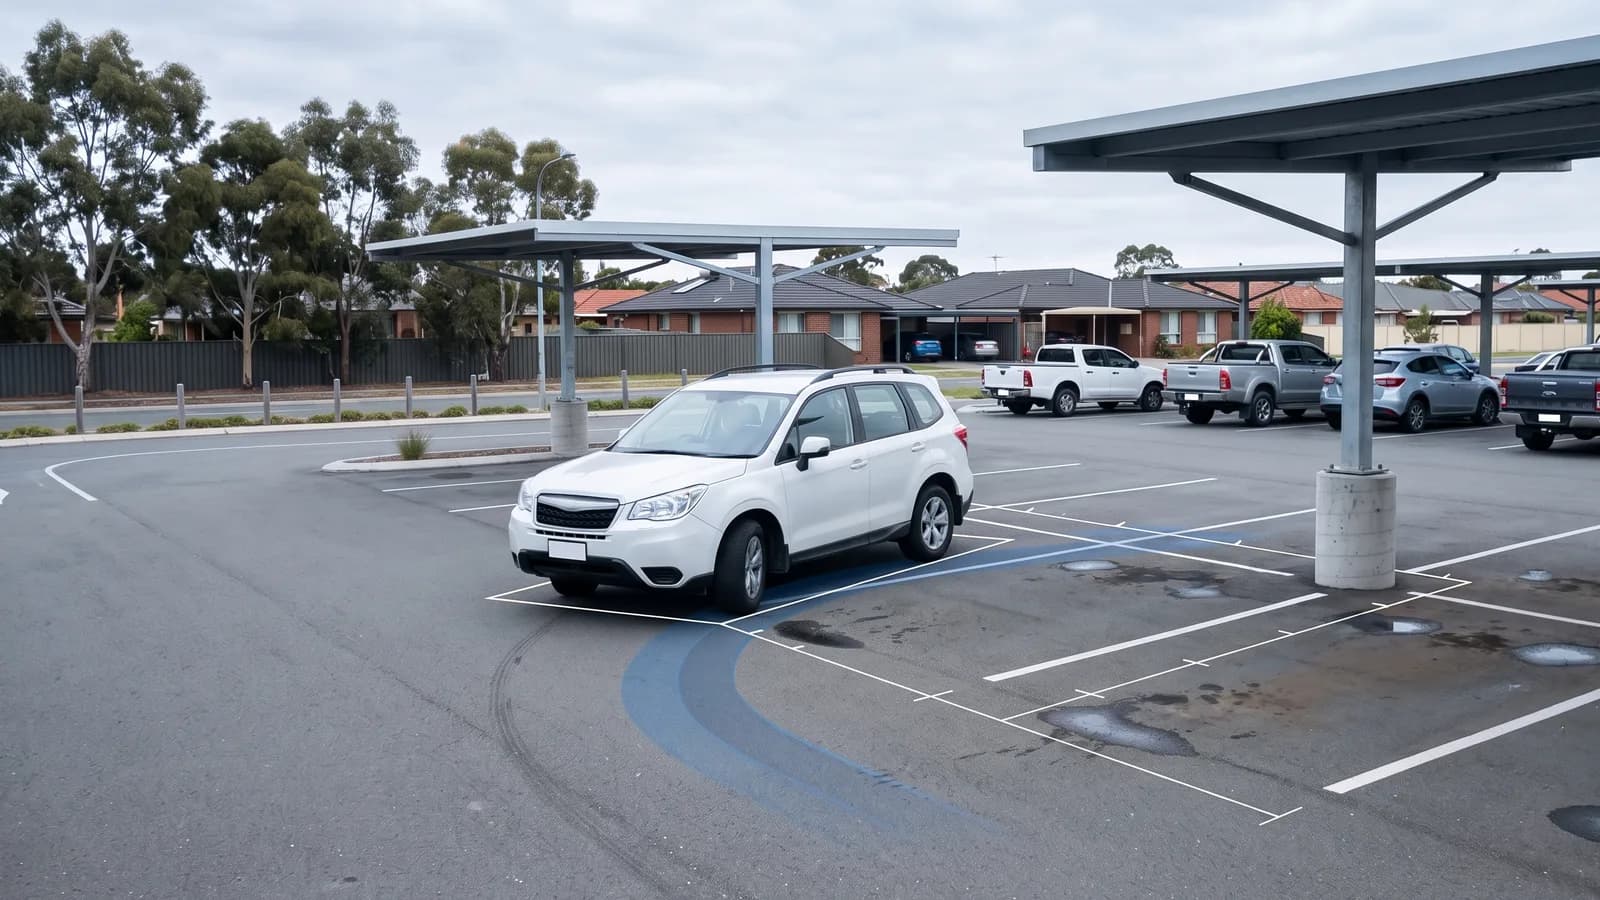
A swept path diagram is the drawing a council, highway officer or client actually looks at: the site plan, the design vehicle, the path it drives, the area it sweeps and the gap left to the kerb, the column or the parked car. You do not need CAD to produce one. This post is the click-by-click version of the procedure in the swept path analysis guide: a PDF or a photo of the plan goes in, a to-scale sheet comes out, in the browser. The two worked examples are Australian, a B99 car in a car-park aisle and a 12.5 m Heavy Rigid Vehicle at a loading dock, with one aside each for the UK and the US.
What the sheet has to contain is set out in the guide's section on what a swept path diagram must show. This post shows where each of those items comes from in the tool.
Before you start: the plan and the vehicle
You need two things that no software can supply.
A plan with one dimension you trust. A site plan, a car-park layout or an aerial photo as PDF, JPG, PNG or WebP (up to 20 MB in PathSweeper). The analysis is only as good as its scale, so pick a dimension on the plan that you can verify: a dimensioned bay length, a wall measured on site, a boundary from the survey. A scale ratio printed on a PDF is not that dimension; the PDF may have been resized on its way to you.
The design vehicle your reviewer expects. Not the vehicle you happen to own but the one the authority names, or the largest vehicle that will use the space regularly. Where that is written down for your project, it is in your authority's drawing standard or development control plan, not in the software. Camden Council's DCP, to take one New South Wales example, requires that "a swept path analysis prepared by a suitably qualified professional must be provided in accordance with AS2890.2" and that it shows a Heavy Rigid Vehicle manoeuvring through the subdivision. The vehicle, the standard and the movement are all named by the council, and the tool's job is to draw them.
Step 1: upload the plan and calibrate the scale
Open a new project, choose Image or PDF in the upload dialog and drop the plan in. It becomes the background of the project. Then press the Calibrate tool in the left rail. The panel asks for exactly what the paragraph above prepared: zoom to a reference of known length, click its two ends, type the real-world distance in metres or feet, confirm. Every path, every envelope and every measurement in the project is scaled from these two clicks, which is why the other tools stay greyed out until calibration is done.
Two habits that pay off: calibrate on the longest dimension you can verify, because a click error of one pixel matters less over 40 m than over 4 m; and check the result once with the Distance tool on a second known dimension before drawing anything.
Step 2: choose the design vehicle
Press Vehicle (or V on the keyboard). The library is sorted by country and standard, then by category. Four standard vehicles (passenger car, delivery van, two-axle truck, bus) are free and need no account; the national libraries, among them Australia's 24 Austroads 2023 and AS 2890 vehicles, the UK DB32 and FTA 2016 sets and the 20 AASHTO 2018 vehicles, are part of the Project Pass (€39 one-time per project) or the Annual Pass. The Australian list carries a Standard filter above it, because two document families share the bucket: the Austroads road-design vehicles and the AS 2890 parking and loading vehicles, which is where the B85 and B99 cars and the SRV, MRV and HRV come from. Each card shows length and width, wheelbase, outer turn radius and maximum steering angle, so you can check the vehicle against the one your authority printed before you confirm it.
If the vehicle you need is in no library, a current refuse vehicle, say, or a specific fire appliance, build it from the manufacturer's datasheet in the custom vehicle builder. Building and saving a custom vehicle is free with a signed-in account; using it in a project needs a Project Pass or Annual Pass.
Step 3: draw the path the driver would steer
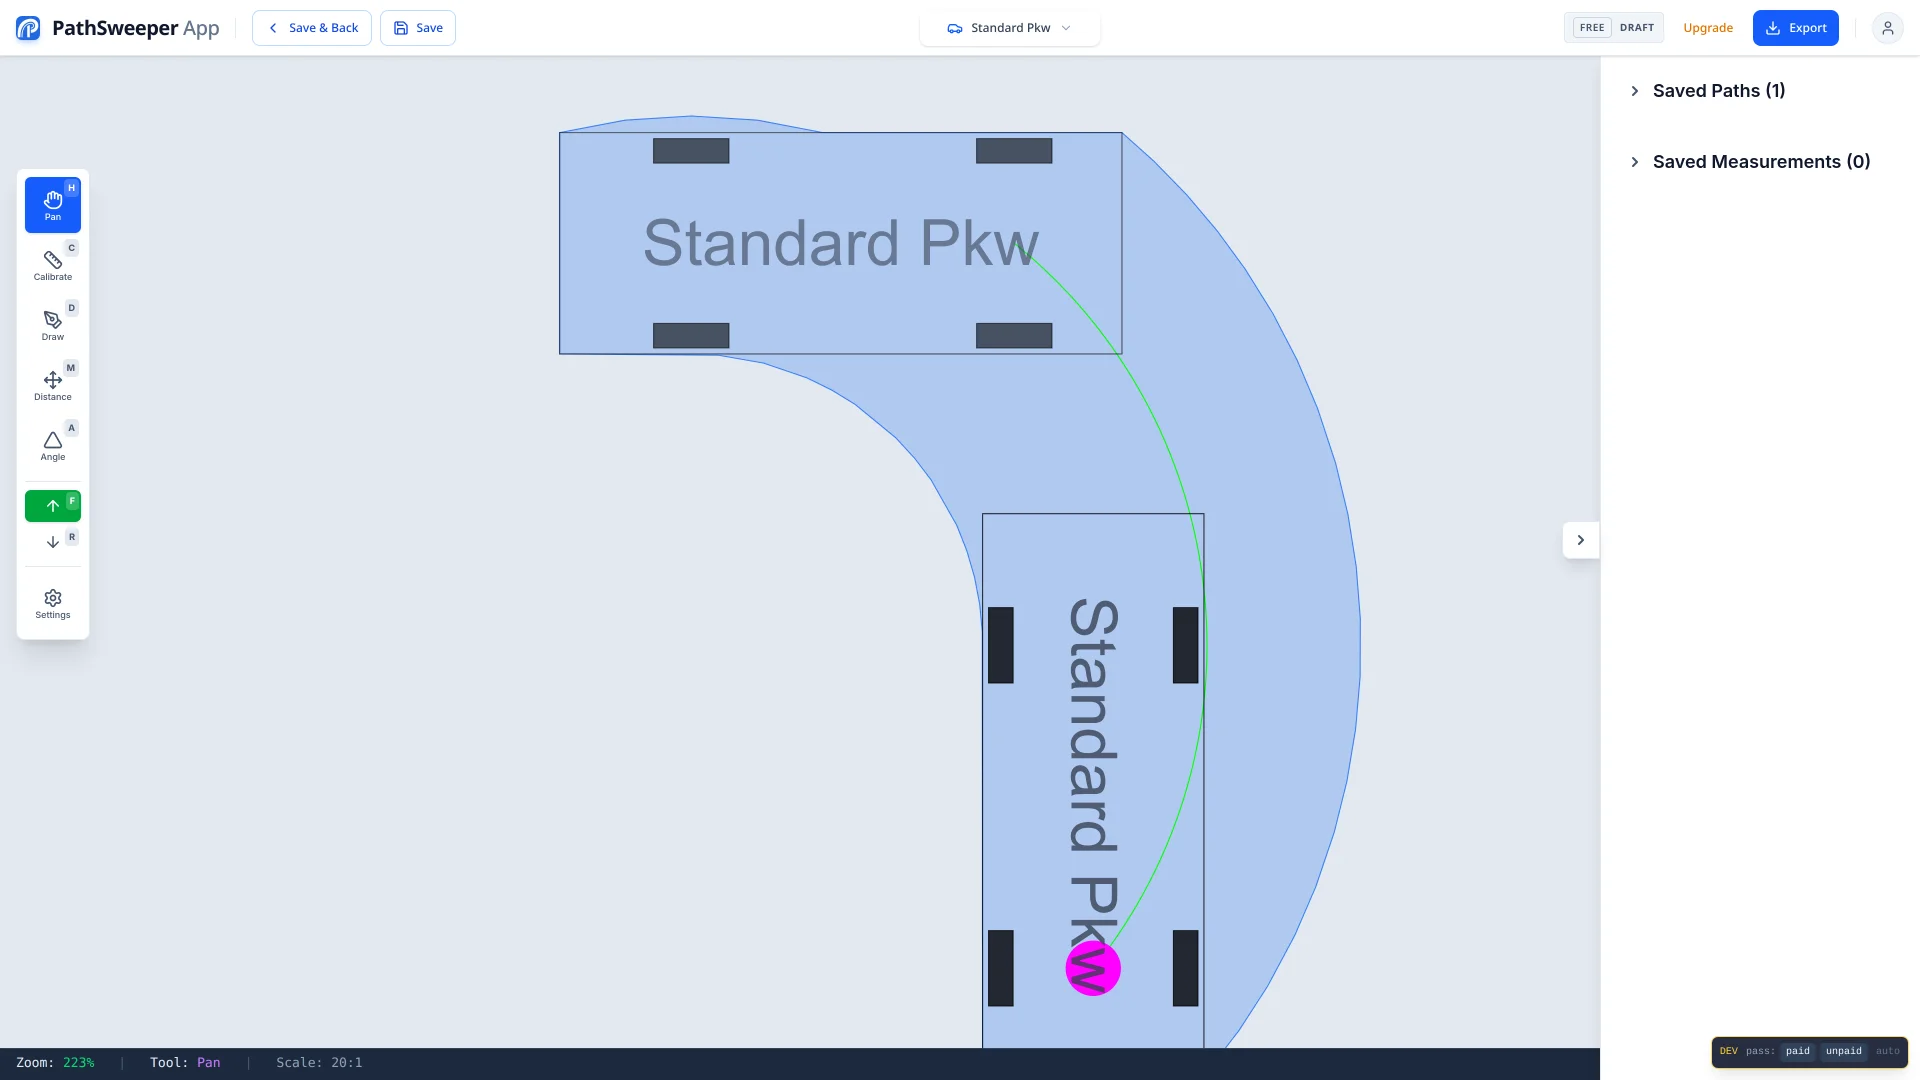
Press Draw (or D), click where the manoeuvre starts and keep clicking along the path the driver would actually take: the approach straight, the turn, the exit. The swept envelope is calculated as you go, so you see immediately whether the inner rear wheel clips the kerb or the outer front corner reaches the column. Right-click finishes the path; Ctrl + Z removes the last point.
Three controls decide how realistic the path is:
- Forward or reverse.
FandRswitch the direction of travel; a dock approach or backing out of a bay is drawn in reverse and the steering geometry flips with it. Reverse is not offered for double-hinged combinations such as B-doubles and road trains, which jackknife almost immediately when backed. - Steering mode. By default a free project turns the wheels from a stop, so every turn starts as a clean arc. The second mode, steering while moving, turns the wheel gradually as the vehicle rolls and widens the swept path a little, which is closer to what a driver does. Steering while moving can be previewed free, but a path drawn with it can only be saved and exported with a Pass.
- Clearance. In Settings, the clearance sliders add a margin around the body, the front and the rear. The expanded envelope is drawn as the swept path; Show envelope without clearance draws the bare body sweep inside it so both are on the sheet.
When the path is done, save it with a name that says what it is ("HRV, dock 2, reverse in"), because that name is what the reviewer reads in the path list, on the plan sheet and in the CAD layers later.
Step 4: read the envelope and the clearance
The envelope is the union of every position the body passes through. Its outer edge is traced by the outer front corner, its inner edge by the inner rear wheel, never by the rear corner, so a diagram that shows the body corners only is wrong on the inside of every bend. The guide explains why the rear wheel sets the inner edge; on the drawing it is enough to know that the envelope you see already accounts for it.
To read the clearance, use the Distance tool from the envelope edge to the obstacle and right-click to save the measurement. Saved measurements are part of the project and appear in the exported image, so the reviewer sees the number, not just a gap. If the plan came in as a CAD file, the perpendicular lock makes that measurement true wall-to-wall.
Step 5: document the sheet
This is where diagrams are rejected, more often than for bad geometry. The items are the guide's list; here is where each comes from in the tool:
- Title block and bar scale. The A3 plan set states its ratio in the title block and carries a bar scale, so a print can be measured with a scale ruler. A plain PNG or PDF image has neither; save a Distance measurement of a known length on the plan so the image carries its own reference.
- Vehicle label and data sheet. The vehicle's name is drawn on its body at the start and end of the path; the vehicle data sheet lists length, width, wheelbase, overhangs and outer turning radius for every vehicle used.
- Arrow markers. Every node of a drawn path carries one in the direction of travel, so forward and reverse legs are distinguishable on the sheet.
- Envelope colours. The envelope is drawn in the path colour, with or without hatching, plus the no-clearance outline if you switched it on; the clearance value is printed in the title block of the A3 set and in the path card.
- One path per sheet. Save each manoeuvre as its own path and export them separately; the batch ZIP writes one file per path, the A3 set one sheet per path.
What else your authority wants on the sheet is in its drawing standard. Main Roads Western Australia's Drawing Presentation Guidelines, for example, list for a vehicle swept path drawing the proposed design, lane configuration, "design vehicles turn paths and reference to design vehicles used and minimum turning radius to 'outside front wheel'", a reference line and chainage, cadastral boundaries, a north point and road names, at 1:250 or 1:500. That is a state road authority's list for its own drawings; a council development application will have its own. Where nothing is written, use the guide's list and a title block.
Step 6: export free as image, or to scale with the Pass
Press Export. PNG, JPEG, the PDF that wraps the PNG and the batch ZIP are free. DXF and DWG, the A3 plan set and the vehicle data sheet are part of the Project Pass or Annual Pass. The DXF carries the analysis as named layers in millimetres, with a reference point you place on a building corner so it drops into the office's CAD drawing in position; how that works is in the post on DXF and DWG export. The A3 set is the deliverable for a submission without CAD at all: cover with sheet index, overview sheet, one sheet per path and the data sheet, each with its own scale in the title block.
Worked example 1: a B99 car in a car-park aisle (Australia)
The B85 and B99 design cars are defined in AS/NZS 2890.1:2004, Parking facilities, Part 1: Off-street car parking, a paid Standards Australia document that cannot be reproduced here. Their overall dimensions are restated publicly: the B85 at 4.91 m by 1.87 m, the B99 at 5.20 m by 1.94 m. Both ship in the Pass library as "B85 Passenger Car (AS/NZS 2890.1)" and "B99 Passenger Car (AS/NZS 2890.1)", behind the AS 2890 filter rather than with the Austroads road-design vehicles, which have their own Austroads design vehicles guide; the aisle widths, bay sizes and the clearance the standard requires are in the standard itself, so buy or borrow it before you commit the layout.
- Upload the car-park layout as PDF. Calibrate on a dimensioned bay length or the aisle width if it is dimensioned on the drawing.
- Vehicle: Australia, filter AS 2890 (parking & loading), category Passenger Vehicles, B99 Passenger Car.
- Draw the entry: along the aisle, then the turn into the bay, forward. Then a second path, reverse, out of the bay and along the aisle in the other direction. Save each with its own name.
- Measure the clearance from the envelope to the bay lines on both sides and to the column at the aisle end, and save the measurements.
- Export: PNG for the design meeting, the A3 plan set for the application.
If the B99 clears the column and the B85 is the vehicle your council names, run the B85 as well; a diagram that shows both costs one more path.
Worked example 2: a Heavy Rigid Vehicle at a loading dock (Australia)
AS 2890.2:2018, Parking facilities, Part 2: Off-street commercial vehicle facilities, is the loading-dock and service-access standard, also paid. Its scope, as the store page states it, sets out "minimum requirements and recommendations for the provision of off-street parking, loading and manoeuvre areas for seven representative commercial vehicles classified according to limiting dimension and minimum turning circle". The Pass library ships the HRV as "Heavy Rigid Vehicle (HRV) 12.5m (AS 2890.2:2018)", next to the SRV and MRV; 12.5 m is also the NHVR's general length limit for a rigid heavy vehicle under the Heavy Vehicle National Law. The standard's own dimension tables are in the paid document.
- Upload the site plan and calibrate on the dock length or a surveyed boundary.
- Vehicle: Australia, filter AS 2890, category Trucks, Heavy Rigid Vehicle (HRV) 12.5m.
- Draw the approach forward from the street to the point where the driver stops to reverse. Save it. Start a second path there, press
R, and draw the reverse leg into the dock; the steering geometry flips with the direction of travel. - Set the clearance your authority asks for in Settings before you judge the gap to the dock walls, and switch on the no-clearance outline so the reviewer sees both envelopes.
- Export each path on its own sheet.
The council that asked for the analysis will usually say which vehicle: Camden's DCP names the Heavy Rigid Vehicle for the whole subdivision, including waste collection and the turning movements at turning bays and turning heads. If yours names a different one, the Medium Rigid Vehicle (MRV) is in the same Trucks category and the Articulated Vehicle (AV) 20 m from the same standard under Tractors & Semi-Trailers, both behind the AS 2890 filter.
The UK aside: refuse vehicle first, DB32 still cited
In England the authorities fetched for this post all ask for swept paths (some planners say vehicle tracking), and the vehicle a local highway authority wants to see first is the refuse vehicle. Bristol's Transport Development Management Guidance states that designers "will be required to submit swept paths for vehicles most likely to use the site, which will normally be a 11.4m refuse vehicle and emergency vehicles", that envelopes must include wing mirrors, and that swept paths must show vehicles entering and leaving a junction without entering the opposite side of the carriageway. Bromley's validation guidance asks for the swept path of its own refuse vehicle wherever the waste vehicle enters the site. For turning heads, Birmingham's Highways Developers Guide still points to the "(now superseded) 1:200 diagrams in Appendix 1 of Design Bulletin 32". The four DB32 template vehicles and the FTA Designing for Deliveries (2016) set are in the UK library; none of the DB32 or FTA templates is an 11.4 m refuse vehicle (the DB32 refuse vehicle is 7.9 m), so the Bristol vehicle is built in the custom vehicle builder from the dimensions Bristol prints in Fig 1 of the same document or from the manufacturer's datasheet. Which document applies to which road is in the UK design vehicles guide, and turning-head layouts in the turning bay design post.
The US aside: the AASHTO class, from a free state manual
US state manuals name an AASHTO design vehicle: P for the passenger car, SU-30 for the single-unit truck, WB-67 for the interstate semi-trailer. The Green Book that defines them (A Policy on Geometric Design of Highways and Streets, 7th Edition, 2018, item GDHS-7) is sold by AASHTO; the classes and the rule for choosing one are reproduced free in state DOT manuals. TxDOT's Roadway Design Manual, section 4.3.2, says the designer "should consider the largest design vehicle that is likely to use that facility with considerable frequency", and that "if a larger class of vehicle typically uses the facility, that vehicle shall govern the design". The 20 AASHTO 2018 vehicles ship in the Pass library with dimensions shown in feet, and the calibration panel takes feet as well. Where the Green Book sits legally and what the WB number means is in the AASHTO design vehicles guide.
What the free version is for, and what it is not
Everything up to Step 4 runs free and without an account on the four standard vehicles, and the free image export is a perfectly good diagram for a design meeting or a feasibility check. A submission to an authority usually needs the vehicle the authority named, a scale on the sheet and often a DXF for the consultant's drawing set, and that is what the Project Pass covers for one project, with an invoice you can pass on. Nothing in this post makes a drawing comply with any standard; the tool draws the vehicle you chose on the plan you calibrated, and the reviewer checks it against the standard they hold.